
On Linux servers running multiple uplinks, a default route alone isn’t enough. When management traffic needs its own egress, replication flows have to use the secondary link, or specific source networks must use a different gateway, policy-based routing becomes necessary. On Ubuntu-based servers, it’s healthier to set this up persistently and readably through Netplan rather than writing ip rule commands by hand.
What problem does this solve?
In a single NIC setup, ingress and egress traffic flow over the same path. But with dual uplinks, these issues appear:
- Reply packets leaving over the wrong interface
- Sessions broken by asymmetric routing
- Loss of management access during a failover
- Replication traffic squeezing the production link
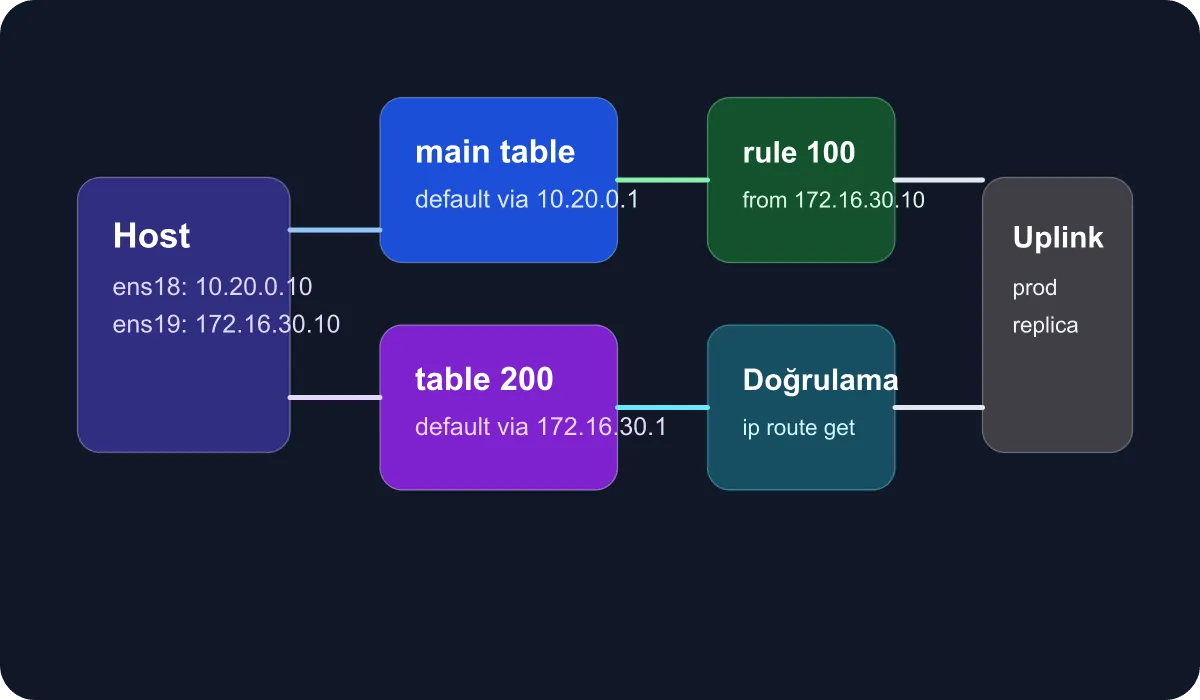
Policy-based routing makes packets routable not only by destination but also by source IP, table, and rule priority.
Sample scenario
In this guide I’m working with the following layout:
ens18: production network, default trafficens19: replication and backup access network10.20.0.10/24: application IP172.16.30.10/24: management or replication IP
The goal is to force traffic originating from 172.16.30.10 over the secondary gateway, preserving source symmetry even when the primary route is up.
Netplan configuration
We’ll start with a custom routing table definition. On Ubuntu, the table number can be specified directly in the file:
network:
  version: 2
  renderer: networkd
  ethernets:
    ens18:
      addresses:
        - 10.20.0.10/24
      routes:
        - to: default
          via: 10.20.0.1
    ens19:
      addresses:
        - 172.16.30.10/24
      routes:
        - to: 172.16.30.0/24
          via: 172.16.30.1
          table: 200
      routing-policy:
        - from: 172.16.30.10/32
          table: 200
The critical part of this definition is the routing-policy section. With it, traffic originating from 172.16.30.10 doesn’t use the main table — it uses the routes inside table 200.
Adding a default route for the backup link
If the second uplink will be used as remote access or a site-to-site backup, the structure expands like this:
    ens19:
      addresses:
        - 172.16.30.10/24
      routes:
        - to: default
          via: 172.16.30.1
          table: 200
          metric: 50
      routing-policy:
        - from: 172.16.30.10/32
          table: 200
          priority: 100
The metric here decides the route preference within the same table; routing-policy decides which table is selected. Confusing those two is one of the most common mistakes in policy-based routing setups.
Apply and verification steps
Place the file at a real target path such as /etc/netplan/99-multi-uplink.yaml, then follow this sequence:
sudo netplan generate
sudo netplan try
ip rule show
ip route show table main
ip route show table 200
ip route get 8.8.8.8 from 172.16.30.10
The last command in particular tells you clearly whether the packet is going over the expected gateway.
How should failover logic be approached?
Policy-based routing alone doesn’t perform health checks. If you want real failover:
- Monitor gateway reachability with keepalived or a similar tool
- Trigger route changes via a script or networkd-dispatcher
- Revisit application timeouts against the new topology
Even if the route changes server-side, if the upstream firewall or NAT setup doesn’t recognize the second link, the failover stays on paper. So the network design has to be validated end to end.
Common failure scenarios
- Reverse path filtering (
rp_filter) dropping packets - A policy rule bound to the wrong source IP
- A missing return route inside the table
- Critical traffic such as DNS or management services landing on the wrong link
For these issues, the first commands to run are ip rule, ip route get, journalctl -u systemd-networkd, and where needed tcpdump -i ens19.
Conclusion
Policy-based routing and backup link design with Netplan lets you take control back from the default route on Linux servers running multiple uplinks. With the right table, rule priority, and verification habit, you can keep both management traffic and critical data flows separated more predictably. In enterprise infrastructures especially, this discipline raises network resilience considerably.